Juicy & Crispy Air Fryer Chicken Tenders: The Buttermilk Brine Secret
Imagine biting into a chicken tender that’s perfectly golden, audibly crispy on the outside, and unbelievably moist and tender on the inside. Forget dry, bland, or greasy fried chicken; we're about to unlock the secret to the absolute best homemade
Whether you’re a seasoned home chef or just embarking on your air fryer adventure, this article promises a foolproof method, comprehensive tips, and answers to all your common questions. Prepare to revolutionize your weeknight dinners and become the hero of your kitchen table with consistently perfect results, every single time. Get ready to ditch the drive-thru and embrace the superior taste and texture of homemade.
Why Air Fryer Tenders Are a Game Changer
The air fryer has transformed how we approach "fried" foods, offering a fantastic alternative that significantly cuts down on oil without compromising on flavor or that coveted crunch. For
Beyond the health benefits, air frying is incredibly convenient. These tenders can be on your table in under 30 minutes from start to finish, making them an ideal solution for busy weeknights. Plus, the minimal oil means significantly less mess to clean up compared to traditional deep-frying. It's a win-win-win for taste, health, and practicality.
The Buttermilk Brine Secret: Unlocking Unbeatable Juiciness
This is where the true magic happens, elevating your
How Buttermilk Works its Wonders
The reasoning behind buttermilk's power is both simple and scientific. Buttermilk is mildly acidic. When chicken is soaked in it, the lactic acid gently works to break down the tough protein fibers in the chicken. Unlike stronger acids (like lemon juice or vinegar) which can "cook" and toughen the meat, buttermilk tenderizes without causing the meat to become chewy.
Additionally, buttermilk's thicker consistency helps the breading adhere better to the chicken, creating a more robust and even coating that crisps up beautifully in the air fryer. It also imparts a subtle tang and richness that enhances the overall flavor profile of the chicken, making it truly irresistible.
Crafting Your Brine
Making the brine is incredibly straightforward. You'll need:
- Buttermilk: Enough to fully submerge your chicken tenders.
- Kosher Salt: Essential for seasoning and aiding in moisture retention.
- Hot Sauce (e.g., Frank’s RedHot): A dash adds a subtle kick and depth of flavor without making the tenders overtly spicy. This is optional but highly recommended for an extra layer of complexity.
- Optional Additions: Consider a pinch of garlic powder, onion powder, or smoked paprika to further infuse flavor into the chicken before it's even breaded.
Simply whisk these ingredients together in a bowl, add your chicken tenders, ensuring they are fully submerged, and let them brine in the refrigerator for at least 30 minutes. For even more flavor, you can extend the brining time to 2-4 hours, but avoid brining for much longer than 12 hours, as the acid can start to break down the chicken too much.
Crafting Your Crispy Coating: Beyond Basic Breading
While the buttermilk brine ensures juiciness, the coating is what delivers that satisfying crunch. We're going beyond basic breadcrumbs to achieve truly
The Panko Advantage
The secret to an unparalleled crispiness lies in using Panko breadcrumbs. Unlike traditional breadcrumbs, Panko is made from crustless white bread that is processed into large, flaky shards. These flakes have more surface area and absorb less oil, resulting in an incredibly light, airy, and super crunchy texture that regular breadcrumbs simply can't match. They also create a fantastic barrier, locking in the moisture from the brined chicken.
Seasoning Your Coating
A well-seasoned coating is just as important as the brine. While the buttermilk provides a base flavor, the breading is where you can truly customize the taste. Here's a powerful combination:
- All-Purpose Flour: The first layer, helping the egg wash adhere. Season this generously with salt and black pepper.
- Egg Wash: Whisked eggs create the perfect glue for the Panko. You can even mix a splash of the leftover buttermilk into the egg wash for extra tenderizing power and flavor.
- Panko Breadcrumbs: Season your Panko mixture generously! This is your chance to infuse incredible flavor. Consider:
- Garlic powder and onion powder for an umami base.
- Smoked paprika for warmth and color.
- A pinch of cayenne pepper for a subtle kick.
- Dried herbs like oregano or thyme for an aromatic touch.
- For a Latin-inspired twist, as seen in some traditional recipes, a touch of adobo seasoning or even a homemade sofrito spice blend can be transformative.
The key is to press the Panko firmly onto the chicken tenders. This ensures a thick, even coating that will crisp up beautifully. For an extra-crispy exterior, you can even double-dredge: after the first Panko coating, dip it back into the egg wash and then into the Panko again, pressing firmly each time.
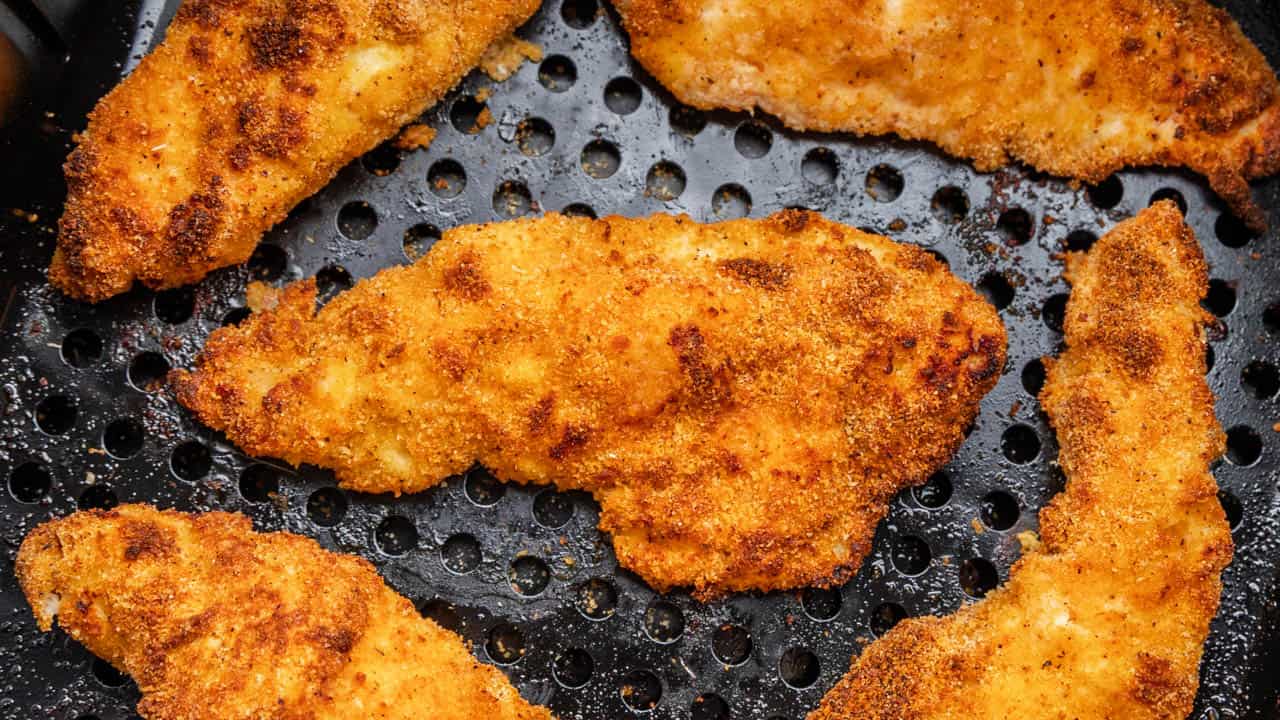
Air Frying for Perfection: Healthier, Faster, Flawless
Now that your chicken is brined and perfectly coated, it's time for the air fryer to work its magic. This method is incredibly efficient, delivering those consistently
Preheating is Paramount
Just like with an oven, preheating your air fryer is crucial. A hot basket ensures that the chicken starts cooking immediately, creating a crisp exterior rather than steaming it. Preheat your air fryer to 375-400°F (190-200°C) for at least 5 minutes before adding the chicken.
Don't Overcrowd the Basket
This is perhaps the most important tip for air frying success. Air fryers work by circulating hot air. If you overcrowd the basket, the air can't circulate effectively, leading to uneven cooking and soggy spots. Cook the tenders in a single layer, in batches if necessary, ensuring there's space between each piece. Resist the urge to stack them!
A Touch of Oil for Optimal Crispness
While air frying uses significantly less oil, a light spritz or brush of oil on the breaded tenders before cooking can make a huge difference in achieving that deep golden-brown color and ultimate crispness. Use an olive oil spray or lightly brush with a neutral oil like avocado or grapeseed.
Cooking Times and Techniques
- Place the prepared tenders in the preheated air fryer basket in a single layer.
- Air fry at 375-400°F (190-200°C) for 15-20 minutes, flipping them halfway through.
- Cooking times can vary slightly depending on the thickness of your tenders and your specific air fryer model.
- Always check for doneness: The internal temperature should reach 165°F (74°C) when measured with a meat thermometer. The exterior should be golden brown and perfectly crispy.
Once cooked, remove the tenders and let them rest for a minute or two before serving. This allows the juices to redistribute, ensuring maximum tenderness.
Serving Suggestions & Family Fun: Make Every Meal a Hit
These homemade
For those who prefer a traditional oven method, explore our guide on Homemade Crispy Oven Tenders: Healthy 30-Minute Family Meal. And if you're curious about the deeper culinary principles at play, you might find our article on the Secrets to Consistently Crispy & Juicy Chicken Tenders at Home incredibly insightful.
Dipping Sauce Delights
The options for dipping sauces are truly endless, allowing everyone to customize their meal:
- Classic Ketchup or Honey Mustard
- Tangy BBQ Sauce
- Creamy Ranch or Blue Cheese Dressing
- Spicy Sriracha Mayo or Sweet Chili Sauce
- Homemade Aioli with garlic and herbs
Perfect Pairings
While fries are a classic accompaniment (and can even be air-fried alongside your tenders!), don't limit yourself. These tenders are delicious with a variety of sides:
- Comfort Food Classics: Creamy mashed potatoes, white rice and beans (a nod to traditional Dominican kitchens), or macaroni and cheese.
- Fresh & Healthy: A vibrant green salad, roasted or grilled vegetables (like asparagus or broccoli), or a fresh coleslaw.
- Unique Twists: Crispy tostones (fried plantains) offer a delightful texture and flavor contrast, while steamed corn on the cob provides a touch of sweetness.
A Kid-Friendly Masterpiece
Your children will undoubtedly love these tenders. Not only are they delicious, but knowing they helped prepare a healthier version of their favorite restaurant meal makes it even more special. This recipe provides a wonderful opportunity to cook with your little ones, teaching them about ingredients and the joys of a home-cooked meal.
There you have it – the secret to achieving truly juicy and
